3d Animation Process
⬐ Click the buttons to skip to sections ↴
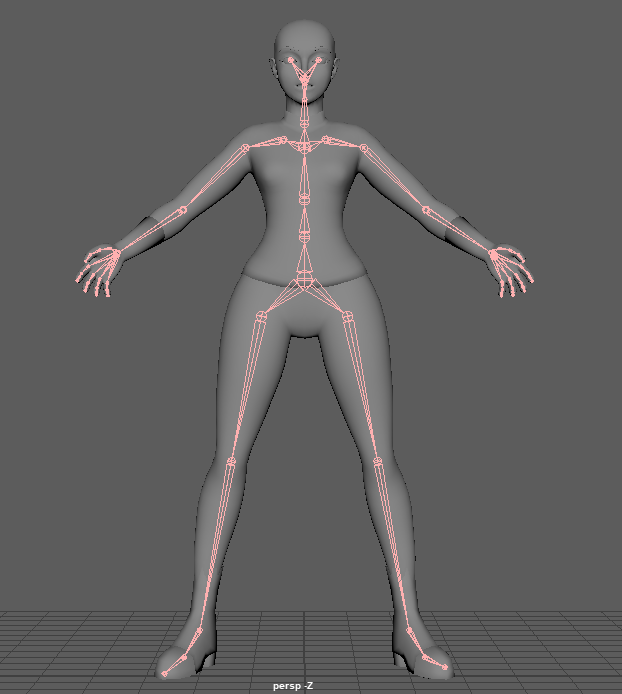
Skeleton:
Animating my character required me to create a specialised skeleton to build my rig. So, I followed a set of Basic Rigging in Maya tutorials by antCGi (Ward, 2014) to complete both the skeleton and the controls. I found these tutorials extremely helpful as they helped me to learn in great depth about the entire rigging process.
One of the most intriguing things I learned during the skeleton creation process was how to use code in Maya to freeze transforms on joints. Freezing the transforms on joints prevents gimbal lock from occurring down the line.
I supplemented these tutorials with some tutorials from Academic Phoenix Plus (Academic Phoenix Plus, 2014) to adjust the skeleton for my specific model.
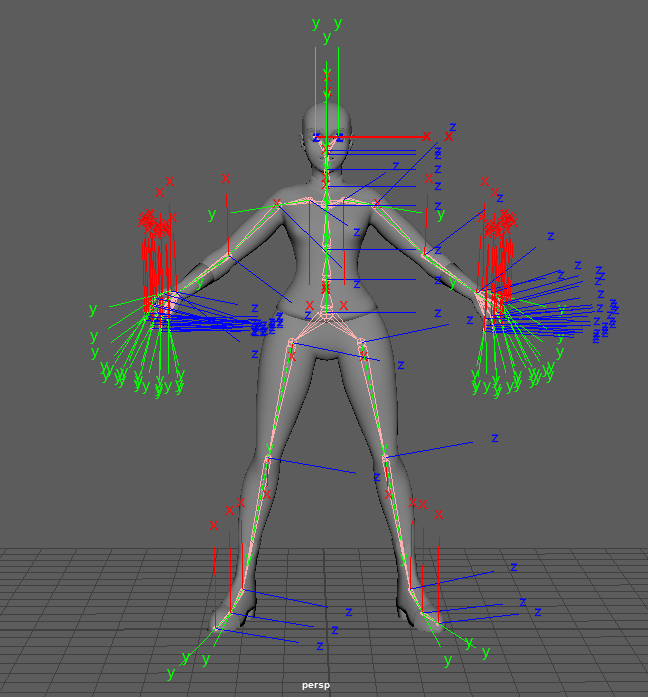
IK & FK Controls:
To build the controls for my model, I began by creating IK / FK blend controls for the arms. Creating an IK / FK blend rig involves multiplying the joints and using the node editor to drive the visibility and weight of each set. At first, I found this process quite complicated, but with trial and error – and a lot of research – I figured it out. I primarily used antCGi’s (Ward, 2014) rigging tutorials to aid me in this process.


Some of the difficulties with creating an IK / FK blend rig was ensuring the controls were all oriented correctly to the joints. I corrected the orientation by creating offset parent groups for each control. Correct control orientations allowed me to drive joints in the same rotation, such as to clench the fist or bend the leg.
I used vertex editing to create the basic shapes of the controls across my model. Then, I used code to bind together some curves to create more complex shapes – as seen on the eye and hand controls. Having customised control shapes allowed me to distinguish between controls that might be overlapping.
One of the challenges during control creation was ensuring that the right parts of the joints rotated/transformed with each control. Sometimes I found that parenting the control to the closest joint didn’t always give the intended result. For example, when creating the hip control, I parented it to the waist joint so that the entire lower torso would move with it (as opposed to only the hips).
Weight Painting:
The default skin binding produced fairly accurate results – a testament to the care that went into the model and skeleton. The GIF below is the default skin binding created using the “Heat Map” method. Some problem areas I noticed from the default binding were clipping around the neck, bending smoothing, and the extent of the effect across regions of the torso.
I spent some time experimenting with manually painting and adjusting the skin weights that were already present. However, eventually, I decided that some areas would be incredibly time-consuming to correct while leaving the smoothing in place. Therefore, I manually redrew the skin weightings at 100% per area and then went in and smoothed the edges using Flood Smooth.
My manual re-painting paid off and produced very accurate results. However, I was still noticing some clipping between the meshes. I left the clipping for the time being as I wanted to see how it looked in motion first. I resolved these issues later in the animation phase by adjusting the skin weights.
After completing the body’s weight painting, I moved on to creating movement controls for the face. I considered blend shapes but wanted to challenge myself to create a joint-only rig.
Using a joint-only rig was slightly more time-consuming during the animation phase, and I did not use it much aside from blinking and squinting. However, when it came to closing the mouth, I appreciated the added flexibility offered by a joint-based facial rig, as I could adjust the cheekbones and pout very easily.


Armour:
I went into the process of animating, believing that the armour and cloth would be the most difficult parts of the process. However, adding the armour was one of the easiest parts.
All that was required to join the armour to the body was to add skin weights to the armour based on which body part it was covering. Since I already had experienced creating hard-edged skin weighting sections while re-painting the body, making the hard-edged zones necessary for the armour felt simple.
Additionally, I created some joints and controls for the shoulder piece, materials, and weapons. As this repeated much of what I had completed earlier, it felt pretty simple. I’m glad that I took the time to research and understand rigging methods so that I could create these elements without reference to tutorials.

Although I’m demonstrating the joints I set up for the materials, I ended up replacing these later with dynamic cloth.
I decided to replace them because joints did not have accurate collision properties. Using the joints meant having huge tubular collision elements that would often get caught around the legs. The dynamic cloth had much more reliable collision detection – though it was also very intensive to render.
Below are two versions of the dynamic cloth materials I created for the flexible elements of the model. One version has high rigidity and low mass for fast-moving animations, and the other has high mass and low rigidity for more realism.
I found that faster-moving animations required more rigidity than I had accounted for here. This was due to a combination of the cloth dynamics and the push-out force of the static colliders I added to the body parts.
Animation Process:
I found the process easier and more manageable with each successive animation I created. However, it felt like quite a rough beginning when I first began the walking cycle.
I struggled immensely to get the movements correct for the walking cycle. As this was my first time animating a 3d object, I found it to be a very steep learning curve. I expected it to come naturally to me, as modelling did – but it did not.
Eventually, I decided that I needed assistance with learning to animate, and I began to delve into research. Finally, I came across some split frame references that I could import into Maya, purchasable from Endless Reference (Endless Reference | Body Mechanics videos for Animators, n.d.). So, I purchased a bundle containing all the divided frame references available from Endless Reference to use across the three animation sequences.
Using direct reference straight into Maya considerably improved the look of my animation. Alongside referencing The Animator’s Survival Kit (Williams, 2001), I understood why certain movement arcs were delayed or linear/smoothed. However, the styling of the animation was quickly becoming incorrect for my model, and the centre frame was becoming off-centred based on the reference. Since I had already learnt so much about the purpose of different movement sequences, I decided to start from scratch and create only regulated movements.
Although I was very pleased with the animation I came up with, it felt like it wasn’t quite right. So I adjusted the speed of various arcs to create follow-through and overlapping actions.
I also added animations for Leona to be holding her sword and shield. This made her movements feel more life-like as the hand’s limited movement compared to the rest of the body felt rigid. I used slow in and slow out interpolation for the hand animations as these seemed to give the smoothest effect.
Creating the running cycle was considerably more straightforward than the walking cycle. I’m attributing this partially to my gains in experience and the fact that it feels easier to produce the fluid, fast movements required for running. I think the slow movements of a walking cycle made any mistakes much more apparent.
I began the running cycle by blocking out some slow start frames. I decided early on that I wanted to use the principle of easing in and easing out for my running cycle rather than having a linear looping animation.
I wasn’t pleased with the amount of ease-in ease-out that I had created yet, but I decided that I should focus on completing the blocking stage first. So I duplicated some of the sets of frames I had already made to populate the rest of the timeline. I then reversed some of the start frames to generate an end ease-out.

After many iterations of smoothing and adjusting, I had the finished animation. I used the reference from Endless Reference (Endless Reference | Body Mechanics videos for Animators, n.d.) to help correct the movement cycles, and I found that the male references were more helpful in this case. I think the male models proved more relevant because of Leona’s heavy armour – male movements seem more jarring and clunky.
Unfortunately, I also had to spend some time correcting the rigidity and deform resistance of the hair pieces at this stage. They kept flipping over during the fast-paced movements of the running cycle. In future, I will try to keep in mind what I have learned about cloth dynamics to better prepare the dynamic material before animating.
The additional dynamic properties that I had to apply to the hair to prevent it from flipping cost a lot in processing time. So unfortunately, as a result, I was unable to continue to render the cloaks and fur.
For the final animation, I decided to create an attack sequence. For this sequence, I referenced Endless Reference’s (Endless Reference | Body Mechanics videos for Animators, n.d.) vault reference and Essential Sword & Shield Animations for Unreal (space.bar. anim, 2021). This Unreal animation was my main inspiration and reference, although I tried to include elements of more realistic movements from the vault references.
Once again, my most significant obstacle with this animation was the hair. The mesh was constantly flipping, forcing me to increase the dynamic properties further to prevent deformation. Unfortunately, I couldn’t eliminate the deformation; some are still present in the final renders.
My process for creating this animation was the same as running; I began by blocking it out and then iterating to smooth out the gaps. After that, I continued to apply my knowledge from the previous animations, where I discovered tricks such as that the hips should tilt forwards with forward momentum.
Sadly I forgot to record progress gifs for this animation, but the process was similar to the running animation.
Final Renders:
I created one rotating and one 45-degree angle render of each animation segment. I have displayed them below as separate videos.
I also spent considerable time preparing dynamic materials, dynamic backgrounds and environmental effects to use in the render. However, unfortunately, my PC was heating up to almost 100 degrees while trying to render with these, and each frame was taking about 15 minutes to render. Therefore, I was forced to remove all of the additional effects.
References
3dEx, 2018. Autodesk Maya 2018 – FK Arm Rigging Set up.
Available at: <https://www.youtube.com/watch?v=N9gP4Vp-hgc>.
Endless Reference | Body Mechanics videos for Animators. n.d. Endless Reference | Body Mechanics videos for Animators. [online] Available at: <https://endlessreference.com/about-me/>.
Insider, 2021. How Pixar’s Movement Animation Became So Realistic | Movies Insider.
Available at: <https://www.youtube.com/watch?v=QbhsMLD9Hb0&t=196s>.
Legio V Macedonica, 2018. Roman fencing – Protection and attack technique. [image] Available at: <https://www.youtube.com/watch?v=jnoiTX0xZ0Y>.
Maya Learning Channel, 2016. Quick Rigging and Skinning a character for beginners.
Available at: <https://www.youtube.com/watch?v=c538zkwxgTQ>.
Simon Mills, 2015. Armored Soldier Character Rig for Maya | Sci-fi Maya Character Rig.
Available at: <https://www.youtube.com/watch?v=ZdxZhTXo0vg&t=327s>.
space.bar. anim, 2021. Essential Sword & Shield Animations – Unreal Marketplace.
Available at: <https://www.youtube.com/watch?v=yDSjW_2Jd3I>.
Ward, A., 2014. antCGi – Digital Art & Animation Workshops. [online] Youtube.com. Available at: <https://www.youtube.com/c/Antcgi>.
Williams, R., 2001. The Animator’s Survival Kit. Faber and Faber.
Youtube.com. 2014. Academic Phoenix Plus. [online] Available at: <https://www.youtube.com/c/AcademicPhoenixPlus>.

No comments yet.